

Only have one day to see Canyonlands? I got ya covered!
This one day itinerary covers the Island in the Sky portion of Canyonlands (more on the other districts later) and, in my opinion, gives you a great mix of what this park has to offer. You’ll hike 4 trails, see 4 epic viewpoints, check out a huge rock arch, and still have time to spare! I’m going to stick to the highlights for this itinerary, but I will also list optional, quick stops along the way. You can check those out if you have more time!
In total this itinerary takes between 6 and 7 hours to complete.
But before we get into it let’s go over the 3 main districts, and why we’re only covering ONE of them in this itinerary. Trust me, I have good reasons! 🙂
Canyonlands National Park is made up of 3 MAIN districts [at least it’s not 12, amiright?]
- Island in the Sky. The North District
- The Needles. The Southeast District
- The Maze. The Southwest District and the least accessible area in the park
For this itinerary, we’ll be focusing on the Island of Sky area of the park and I’ll explain why! But bottom line is they are much harder to visit for the average traveler.
What makes the Needles and the Maze Districts so difficult to visit?
- Distance. These Districts are pretty far out of your way if you’re doing the Utah Mighty 5 circuit. The Needles is about 2.5 hours from Island in the Sky and it’s going to require backtracking. You need to drive to Moab, head South about 50 miles, and then turn West and drive for another 30 miles or so. The Maze area is almost 6 hours from Island in the Sky and will add more than 8 hours to your trip if you’re planning to go to Capitol Reef afterwards.
- They’re Remote. The Maze in particular, but the Needles kinda are too. Most people who visit these areas are prepared to camp out here, meaning they have shelter, plenty of food, and water. I don’t think you could see either of these districts (and definitely not both) in just one day.
- You Need 4WD and high clearance. It is required for many of the roads in the Needles and ALL the roads in the Maze.
- Maps Can’t Be Trusted. GPS is often inaccurate for these areas, so the NPS recommends using a paper map.
- There’s Very Few Trails. The Needles and the Maze have very few trails, and most of their trails are much longer trails that would take up a good chunk of your day. Adding that onto all the driving time, you aren’t going to experience much unless you’re willing to backcountry camp and invest a few days in each district.
So with all that being said, let’s get to the nitty-gritty.
In this post we’ll go over
- Things To Know Before You Visit
- Frequently Asked Questions
- The One Day Canyonlands Itinerary
Things To Know Before You Visit Canyonlands
1. Check the Weather and Park Alerts before visiting.
For safety reasons, but also to help you pack! Also, the park conditions are constantly changing, and National Parks often have trail and road closures from weather events, wildfires, etc. You can check the current park conditions here.
2. There is NO food, fuel or lodging in the park.
There is clean drinking water at the Visitor Center, but that’s about it. I’ll reiterate this later, but I definitely recommend fueling up in Moab (even if your gas tank is already 75% full), eating a big breakfast, and packing a lunch for the day.
3. There’s a Fee to Enter.
You can pay for your visit at the fee station or you can buy a park pass (or America the Beautiful pass) right at the booth. But, if you plan on visiting 3 or more National Parks within the next 365 days, I recommend buying an America the Beautiful Pass online ahead of time. I’ve visited 5 National Parks so far this year which would have totaled up to $135 in fees. The pass is currently priced at $80. So I’m feelin’ thrifty! And if you don’t want to buy your pass online, you can look up places to purchase a pass on the NPS website, here.
4. The Map Can Be Deceiving.
Looking at the map, it looks like there are more trails and roads off of the Island in the Sky drive than there actually are. The map (even the NPS map) will show many roads / trails jutting off from the road that are not actually accessible from this area of the park. They are way, way below you in the canyon.
5. Make sure you aren’t dependent on cell service.
I got enough bars to use my phone in many places in the park. I actually phoned my dog sitter from the White Rim Overlook. Probably the most gorgeous view I’ve ever had while making a “business” call lol. That being said, it’s not a good idea to rely on it. Fortunately, this part of the park is pretty easy to navigate without GPS.
6. The Park is Open 24 Hours
Did you know most National Parks are open 24 hours a day? Of course this doesn’t include the Visitor Center, but you can head out to an overlook at night and photograph the stars or start a hike pre-sunrise. Bottom line is you won’t get locked in if you decide to extend your itinerary a bit!
7. Be Careful of Wind Gusts
Many of these trails and overlooks are near steep drop-offs. Watch your footing and if it’s windy, don’t get anywhere near the edge! I used to think wind gust warnings were overkill, but I nearly got knocked off my feet a few times while we were here! Don’t mess around with wind gusts.

Frequently Asked Questions About The Park
1. How many days do you need to see Canyonlands National Park?
Half a day to One day. If you’re solely visiting Island in the Sky. If you want to see the Needles, you’ll want to add a full day on top of that (at least). The Maze will require more self-sufficiency, proper equipment, a 4WD / high clearance vehicle, and at least 3 full days. There aren’t many “quick” trails or easy roads through the Maze and it is not recommended for novice off-roaders.
2. What is the best time of year to visit Canyonlands?
Spring and fall. Summer brings unbearable heat and winter can cause poor driving conditions.
3. Can you just drive through Canyonlands?
Yes! Island in the Sky would be the ideal place for a “drive through” trip. You can see many of the popular viewpoints from the parking lots / pull outs.
4. Do you need 4 wheel drive for Canyonlands?
Not for Island in the Sky. But yes, you do need 4 wheel drive for the Maze and for many areas of the Needles.
5. How far is Canyonlands from Moab?
40 minutes or 33 miles. That is the driving time and distance from Moab to Island in the Sky Visitor Center.
6. Do I need a reservation to enter Canyonlands National Park?
No. At this time there is no need to make a reservation. Reservations are becoming increasingly prevalent at U.S. National Parks because of overcrowding issues, but it hasn’t been implemented at this National Park.
7. How long does it take to drive through Canyonlands?
21 minutes. It takes 21 minutes to drive from the Island in the Sky Visitor Center to the end of the scenic drive (Grand View Point Overlook). If you add Upheaval Dome Road to your drive-through it’ll add 20 minutes (total, there and back to the main road) to your trip.
8. What should I bring to Canyonlands?
Bring sunscreen, plenty of water, enough food for the day, and a full gas tank. There is no fuel or food within the park. If you’re planning a trip to the Needles or the Maze, you’ll need to pack more than this. They are much more remote than Island in the Sky.
9. Which part of Canyonlands is best?
Island in the Sky. This is the most popular, most accessible area of the park and it offers a good variety of easy and moderate trails. Island in the Sky is the best area of Canyonlands if you’re planning a quick visit or if you just want to drive through the park.
If you have more time, I’d recommend throwing these trails / stops into the mix:
False Kiva Trail
Distance: 1.9 Miles
Elevation Gain: 426 Feet
Difficulty: Moderate
Trail Type: Out & Back
Dead Horse Point State Park
– Not within the National Park
– 22 minute drive from Visitor Center
– VERY popular stop (especially for sunset)
– Campground fills up months in advance.
↓ CANYONLANDS ONE DAY ITINERARY ↓
Stop 1. Moab: Pack Lunch, Get Breakfast, Fuel Up, Grab Snacks
*OPTIONAL* Wake up early (pre-breakfast) for first light / sunrise and head to one of Canyonland’s popular sunrise viewpoints:
- Mesa Arch *most popular, but also most iconic
- Green River Overlook
- White Rim Overlook Trail
Sunrise at Canyonlands is absolutely stunning! But this will likely mean driving back and forth to the park, since you’ll want to return to Moab for breakfast. So weigh out the pros and cons of that!
Pro tip: If you’re waking up early, have everything ready to go the night before. Plenty of water, something small to eat, your day pack, your camera gear, and your outfit. This increases your chances of follow through since all you have to do is wake up, put clothes on, grab your bag and go.
If you’re taking a pass on the early start, I recommend beginning your day (i.e. getting out the door) by 9am. Of course, the earlier the better, but you’re on vacation so I’m not gonna push ya. Just know that parks usually start to get busy around 9:30 – 10:00am.
Here’s what you’ll need to do to prep for your day trip:
- Fill your water bottle or reservoir. There is clean drinking water at the Visitor Center, but it doesn’t hurt to be prepared.
- Pack a lunch for the day. There’s no food within the park, so if you want to avoid driving back and forth from Moab I recommend packing a lunch and taking advantage of some of the picnic areas!
- Eat a big breakfast. While you’re still in Moab, either grab breakfast or have a nice sit-down meal.
- Fuel up. Fill up your gas tank before leaving. Again, there is no fuel within the park.
- Grab snacks. While you’re at the gas station, pick up some quick trail snacks.
Stop 2. Visitor Center & Shafer Canyon Overlook
TOTAL DRIVE TIME: 42 MINS
TIME AT STOP: 20 MINS AT VISITOR CENTER, 10 MINS AT OVERLOOK
TOTAL TIME: 1 HOUR, 12 MINS
WHAT YOU’LL DO & SEE:
- Refill your water, if needed
- Use the restroom
- Buy souvenirs, if that’s your thang
- Quickly check out the exhibits at the Visitor Center
- Check out & photograph Shafer Canyon – from the parking area, or take a short hike to get a closer view
Once you pass the Canyonlands fee station, your first National Park stop on this one day itinerary is the Visitor Center. It doesn’t have to be a long stop, but it’s always a good idea to do a quick walkthrough. You can also use the bathroom here, buy some mementos, and refill your water.
When you finish up, continue down the road. The very first thing you’ll see (on your left) is Shafer Canyon. Stop here and either view the canyon from the parking area, or hike down for a closer look.
NOTE: Be careful if you’re hiking out to the edge! It was incredibly windy when we visited and even more so at this viewpoint. Wind gusts can be very unexpected and strong enough to push you over the edge. There were a few gusts that pushed me forward, so I stayed a safe distance back.

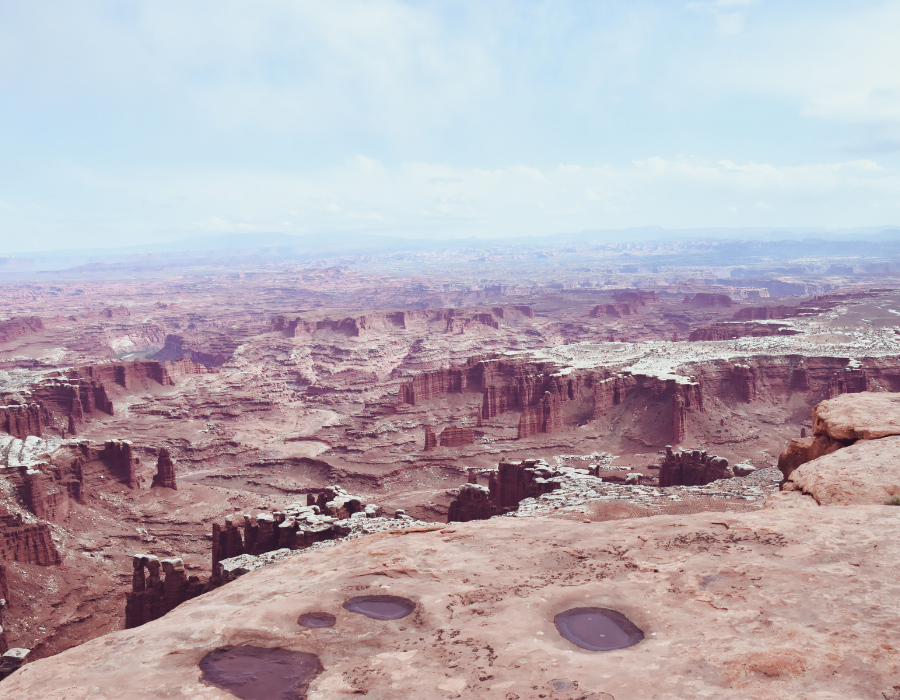
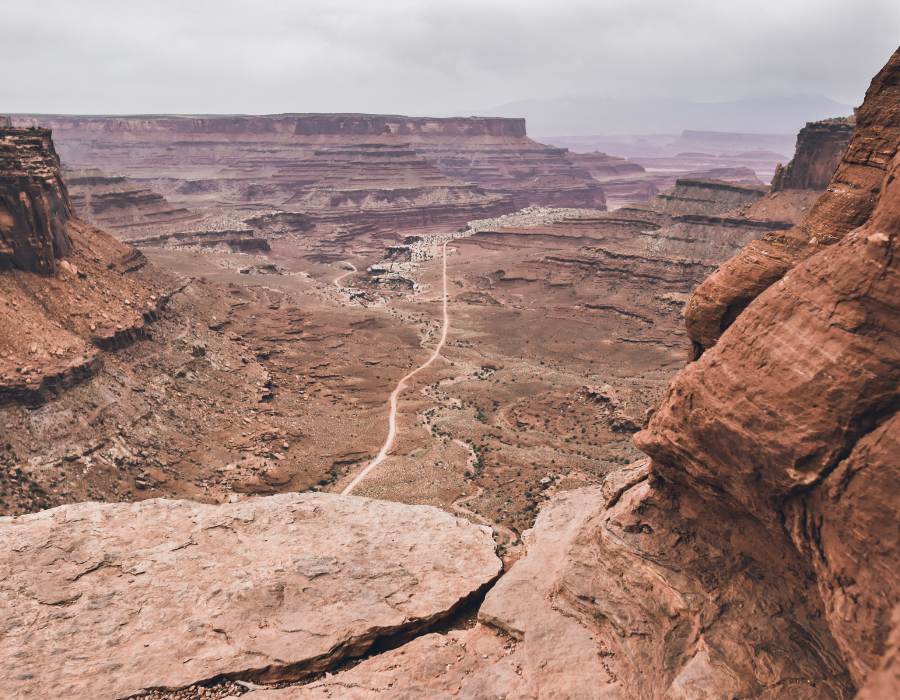
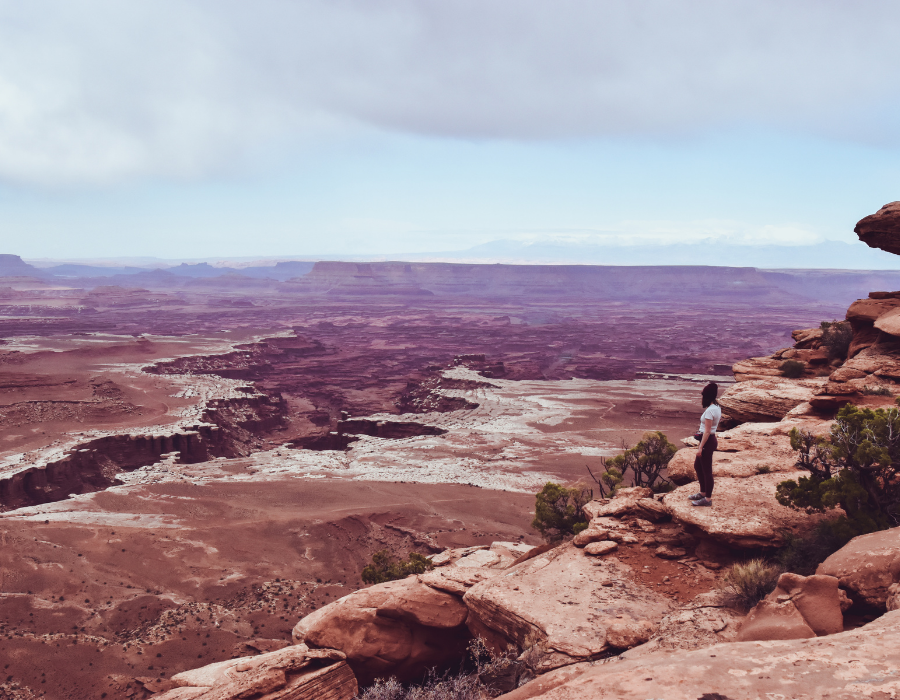
Stop 3. Grand View Point Overlook
TOTAL DRIVE TIME: 20 MINS
TIME AT STOP: 10 MINS
TOTAL TIME: 30 MINS
WHAT YOU’LL DO & SEE:
- Drive down the entire length of the main road and enjoy expansive views around pretty much every corner
- Reach the end of Grand View Point Road
- View the overlook from the paved area, or take a short walk around to find different vantage points
After leaving Shafer Canyon, continue on the main road until the VERY END. You’ll pass several viewpoints and trails, but don’t worry! We’ll get to those. We’re going to start at the end and work our way back.
Grand View Point Overlook is very popular and the parking lot can fill up quickly midday during peak seasons. But despite the crowding, it’s worth a stop and you can definitely find quieter areas to take photos and enjoy the view (if you’re willing to walk around a bit).
* OPTIONAL VIEWPOINT BETWEEN GRAND VIEWPOINT AND WHITE RIM TRAIL:
- Orange Cliffs Overlook: Quick Stop, almost right next to Grand Viewpoint.

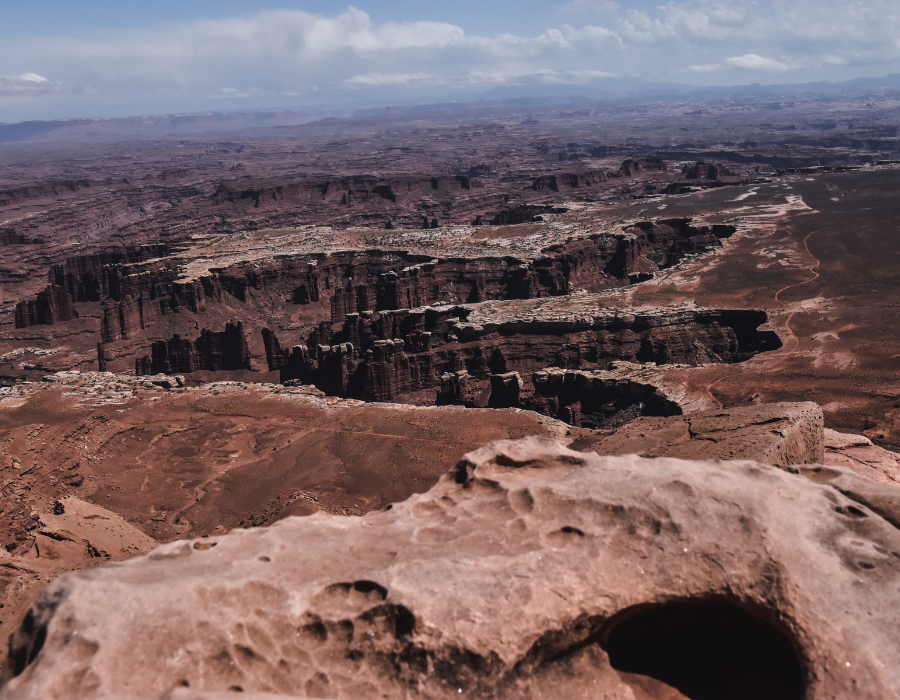
Stop 4. White Rim Overlook Trail + Lunch at the Picnic Area
TOTAL DRIVE TIME: 3 MINS
TIME AT STOP: 1 HOUR, 30 MINS
TOTAL TIME: 1 HOUR, 33 MINS
WHAT YOU’LL DO & SEE:
- Take the short, easy hike to White Rim Overlook
- View White Rim from multiple angles
- Take a quick break in the picnic area and enjoy your lunch!
White Rim Overlook was my FAVORITE place in Island in the Sky. It wasn’t busy at all (even midday in the spring) and the views were absolutely breathtaking. The contrast of the “white rim” against the oranges and pinks of the cliffs is just *chef’s kiss*. And the layers of buttes, hills, and rock formations in the distance make for a gorgeous backdrop.
Note that there is no official “overlook” – you’ll just walk / hop around on the rocks to find different views.
Once you’re done with the trail, return to your car and find a picnic area where you can enjoy your lunch before moving on!
TRAIL INFO
Distance: 1.8 Miles
Elevation: 160 Feet
Difficulty: Easy
Trail Type: Out & Back
* OPTIONAL VIEWPOINTS BETWEEN WHITE RIM OVERLOOK TRAIL AND GREEN RIVER OVERLOOK:
- Buck Canyon Overlook: Very quick stop, gives you a different view of White Rim.
- Candlestick Tower Overlook: It can be seen from the pullout, or you can walk a little bit closer (but it is not a designated trail).
Stop 5. Green River Overlook
TOTAL DRIVE TIME: 14 MINS
TIME AT STOP: 15 MINS
TOTAL TIME: 19 MINS
WHAT YOU’LL DO & SEE:
- Take the short, paved trail out to Green River Overlook
Green River Overlook is very popular and for good reason! The views are endless and breathtaking. You can also hop off the main trail and explore a little bit more, if you want!
This particular overlook is INSANE for sunrise. Midday kind of washed out the vibrant colors, so if you’re willing to wake up early on your trip day (or set aside some time the following morning) I definitely recommend it. The photos are unbelievable!
TRAIL INFO
Distance: 0.2 Miles
Elevation: 6 Feet
Difficulty: Easy
Trail Type: Out & Back
Stop 6. Aztec Butte Trail
TOTAL DRIVE TIME: 5 MINS
TIME AT STOP: 1 HOUR
TOTAL TIME: 1 HOUR, 5 MINS
WHAT YOU’LL DO & SEE:
- Hike out to the well-preserved Puebloan granaries: small stone structures sealed with mud and tucked into the rock
- Scramble up a steep rock face (only attempt with good shoes, good weather conditions, and prior experience!)
- Witness 360 views from the top of the butte
Looking at the trail info for Aztec Butte you’d think this was a super easy hike, but it’s actually considered “moderate” as there is some serious scrambling involved at the end. This trail (or at least the scrambling portions) is not recommended for inexperienced hikers.
If you feel comfortable hiking the trail though, this is a very cool experience! You’ll get to see Puebloan granaries (stone structures, tucked into the rock, used to store food) that have been very well preserved. Just make sure you observe from a distance and don’t climb on or enter the structures, as you could permanently damage them.
TRAIL INFO
Distance: 1.7 Miles
Elevation: 259 Feet
Difficulty: Moderate
Trail Type: Out & Back
* OPTIONAL VIEWPOINTS BETWEEN AZTEC BUTTE AND UPHEAVAL DOME:
- Holeman Spring Canyon Overlook: Can be viewed from the road, or there is a “trail” (I use the term loosely) that you can take to get a closer view. Just be careful and don’t get too close to the edge.


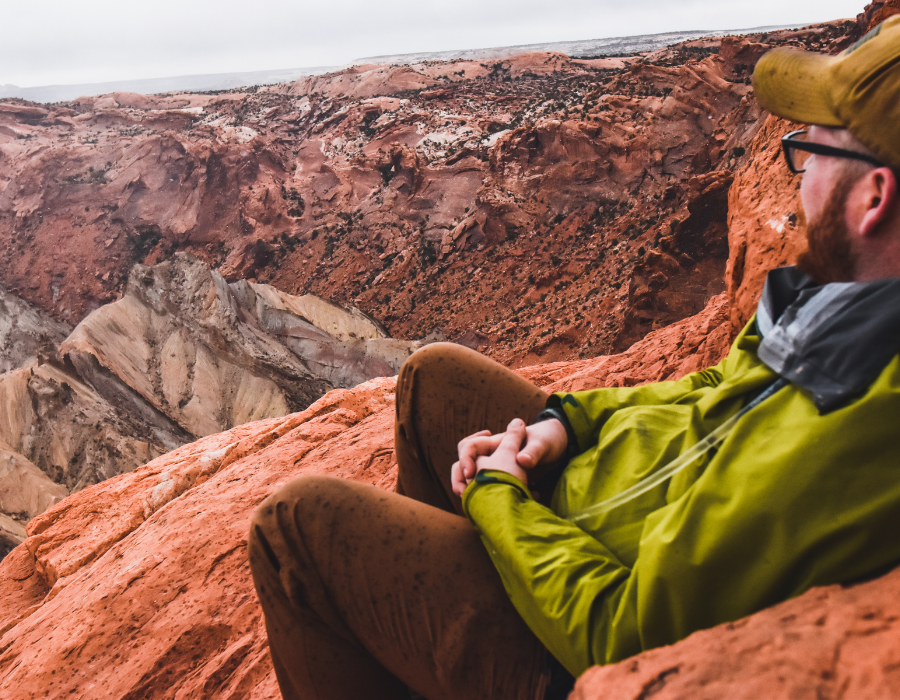
Stop 7. Upheaval Dome via Crater View Trail
TOTAL DRIVE TIME: 8 MINS
TIME AT STOP: 45 MINS
TOTAL TIME: 53 MINS
WHAT YOU’LL DO & SEE:
- Hike out to the colorful (and mysterious) crater – maybe it was a meteorite, maybe it’s Maybelline. Seriously though, scientists are not 100% sure what caused this crater.
- If you’re up to it, continue hiking to the 2nd overlook for a more secluded viewing area
This is such a cool geological feature of the park! Honestly the photos don’t do the colors justice – the crater looks much more blue / green in person. As I stated above, scientists aren’t really sure if this is a crater formed by meteorite impact or if it’s the result of a salt dome that cracked. Either way though, it’s super cool!
Note that some hikers have described the trail to the 2nd overlook as “scrambling”, so just keep that in mind. I didn’t find it too difficult, but I did take it pretty slow since it had just started raining and some of the rock was slippery. If you don’t want to risk it, the first view is cool too! I posted both views in the photos above.
TRAIL INFO
Distance: 1.3 Miles
Elevation: 226 Feet
Difficulty: Moderate
Trail Type: Out & Back
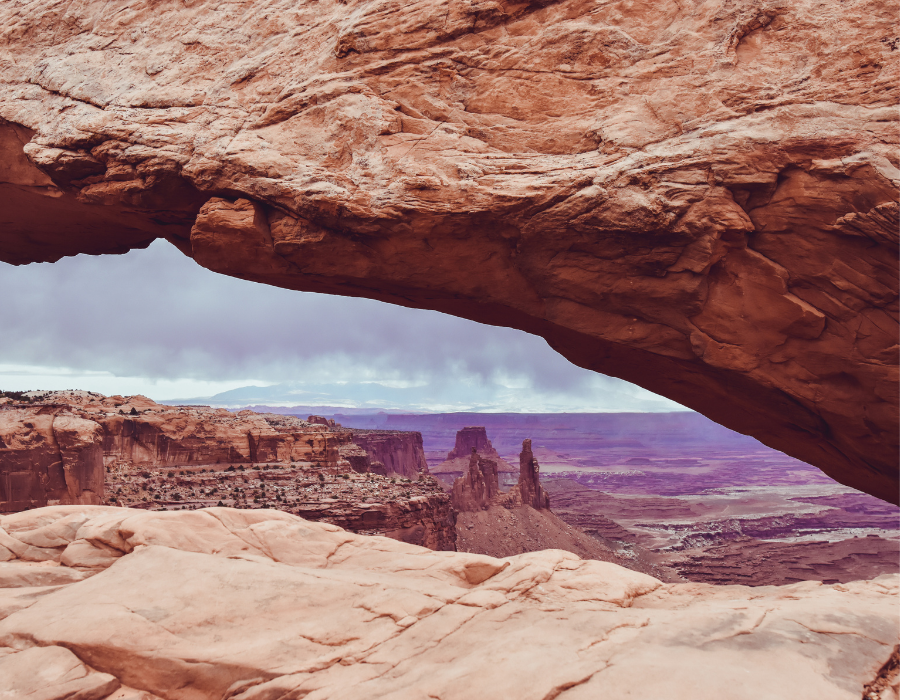
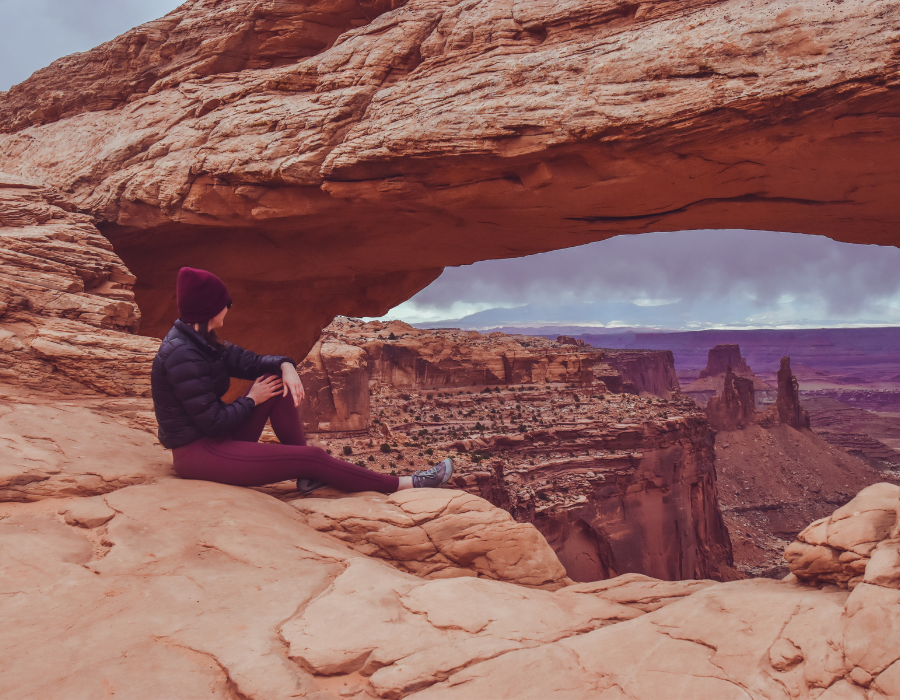
Stop 8. Mesa Arch
*OPTIONAL: Head back to Moab for dinner first, then return to Mesa Arch for sunset
TOTAL DRIVE TIME: 10 MINS
TIME AT STOP: 35 MINS
TOTAL TIME: 45 MINS
WHAT YOU’LL DO & SEE:
- Hike out to, arguably, Canyonlands most famous view – Mesa Arch
- If you’re here for sunset, find a good spot to sit and enjoy it where you aren’t obstructing other people’s views or photos. This is a very popular trail!
Mesa Arch was probably my favorite arch of the whole trip – and yes, that includes Arches National Park. I know that sounds stupid and purposely controversial, but where else do you get an arch that essentially “frames” a view like this? It’s like a window with the most epic desert view money can buy. Except it’s free, so it’s even better!
It doesn’t actually take 35 minutes to complete this trail, but I added some extra time for enjoying the view AND because you’ll likely have to “wait your turn” to get your photos. Especially if you want to be IN the photo. Like I said, this is a very popular trail but definitely worth braving the hordes of people. If you only had time for one stop in the park, this would be the one to pick!
TRAIL INFO
Distance: 0.7 Miles
Elevation: 88 Feet
Difficulty: Easy
Trail Type: Loop
If You’ve Been to the Needles or the Mesa [or you want to see more Canyonlands content] drop your suggestions in the comments!
Traveling through Utah?
CHECK OUT THIS PERFECT ONE DAY ITINERARY FOR CAPITOL REEF NATIONAL PARK
– OR –
THIS EPIC ONE DAY BRYCE CANYON ITINERARY
– OR –
7 EPIC AND EASY HIKES IN ZION NATIONAL PARK
– OR –
THE TRAIL GUIDE TO KANARRA FALLS
DOWN TO PIN? SHARE THIS POST!