

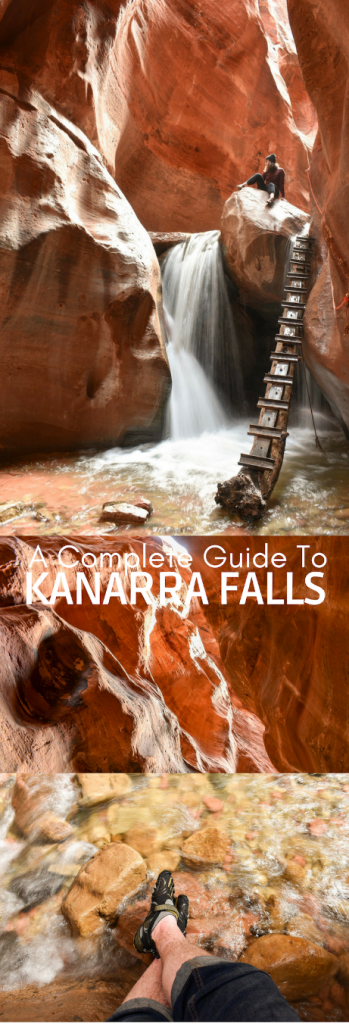
The Kanarra Falls trail is an iconic hike in Kanarraville, Utah and has been gaining popularity like crazy over the last couple of years – mostly thanks to the magic of Instagram. The striking beauty of the first waterfall is the highlight of the hike and honestly, it’s probably the only reason this trail is as famous as it is.
But is it worth the time and effort just for one measly waterfall?
Um, yes. Absolutely, yes.
This is one of those rare occurrences where you show up to an Insta-famous location and it looks completely identical to the photos online. (This is probably the only time that has EVER happened to me). It’s breathtaking. Or maybe that was just the cold water rushing past my bare, nearly-numb toes that attributed to the breathless feeling… but I don’t think so. At least not entirely. Kanarra Falls is truly beautiful.
READ MORE: THE BEST EASY HIKES IN ZION NATIONAL PARK
However, if you think you can just make this a quick pitstop in your summer road trip… I have to burst your bubble. While Kanarra Falls is a short and easy trail, it comes with it’s own set of challenges. Even on a non-busy day in March I saw my fair share of unprepared hikers struggling their way through this “easy” trail. Not to mention, this is no longer an open & free hike. You need to do some planning and obtain a permit.
Ew, right? I hate planning. But it’s worth it!
So without further ado (a.k.a. without further rambling), here’s the complete guide to the Kanarra Falls hike: permits, trail info, packing/planning tips and more! Let’s get to it.
AFFILIATE LINK DISCLOSURE: This post contains affiliate links. Anything you purchase using one of my links earns me a small monetary kickback at NO extra cost to you. Of course I only link to products that I believe to be useful and good quality. If you want more information on affiliate links, click here.
COVID-19 AND HIKING KANARRA FALLS IN 2021:
Kanarra Falls is still open as of April 2021. Currently there are no extra restrictions due to COVID-19. The available permits (per day) remains at 150 hikers and rules/regulations are so far unchanged.
PERMITS
As stated above, you now need a permit to hike the Kanarra Falls trail. You have two options:
- Get a permit online: You can do that by clicking here (Recommended)
- Test your luck and try for a walk-in permit: There is a booth at the trailhead that is manned by a staff member during operating hours (hours are listed below). Note that the limit is 150 hikers per day and once that limit is reached, permits will no longer be sold.
Kanarra Falls permits are $12 per person and are non-refundable, but if the trail gets shut down due to weather conditions you can use your ticket another day. If you purchase you permit online, be sure to print out the e-mail that contains a barcode (or barcodes if you purchased multiple tickets) OR show your phone at the trailhead.
SEASONS & HOURS
Hours of Operation
Since this hike is now “controlled”, you have to check in at the ticket booth and either purchase your ticket (if you’re trying your luck) or present your already-purchased ticket.
Hours of operation vary throughout the year, and the hours continue to extend as the weather warms up and the number of hikers increases. When we went in late March, the trail was open from 8am to 4pm. The trail is open 7 days a week, all year long, as long as weather permits.
Best Time to Visit Kanarra Falls
You could theoretically hike the Kanarra Falls trail all-year round, but you may not want to. Icy conditions can arise in the winter (duh, Kristin) and pose safety concerns that often shut down the trail, temporarily. On the flip side, summer can be extremely hot and uncomfortable – not to mention it draws in the summer crowd and the trail can be extremely busy.
We hiked this trail in late March, which was pretty okay. We didn’t see many people on the trail, we had plenty of time to get our photos, the weather was comfortable enough… but the water was ICE COLD and really hard on the feet.
The absolute best time to hike this trail?
Late April, May, Late August or September.
The weather is decently warm, the water has warmed to a bearable temperature, and you’re in the shoulder season so the trail won’t be crazy-packed with tourists.
LOCATION
The Kanarra Falls trailhead is really easy to find. Any GPS will route you there (type in: Kanarra CREEK Trailhead) and your phone should retain signal as the trailhead is actually in town. Worst case scenario, if something happens to your phone, drive into the town of Kanarraville and the signs will guide you the rest of the way.
General Directions to Kanarra Falls Trailhead: Take Exit 51 off of I-15 and head South on Old US 91. Take 91 straight into Kanarraville (you’ll be on that road for about 5 miles) and then turn left onto E 100 N Street. There should also be a sign there, directing you to Kanarra Falls. Follow E 100 N until the road runs out and you’ll reach the parking lot and trailhead.
TRAIL INFO
General Information
Length: 3.6 Miles RT (to the first waterfall and back)
Elevation Loss/Gain: 600 ft (approximately)
Difficulty: Moderate (solely because of the uneven terrain)
Time to Complete (including photography time): 2.5 – 3.5 Hours depending on your skill level
Trail Type: Out & Back
Terrain: Dirt paths and rocky riverbeds with some scrambling
Family Friendly?: Yes! This is a great family hike, although it seems as though it can be hit or miss. I saw several kids on the trail and the happy kids vs. unhappy kids seemed about 50/50. If your kids are comfortable on hiking trails, this will be a lot of fun for them. But maybe it’s not the best introductory hike.
Dog Friendly?: No. Sadly no dogs or pets of any kind are allowed on this trail.
In Depth Trail Info: What to Expect On-Trail
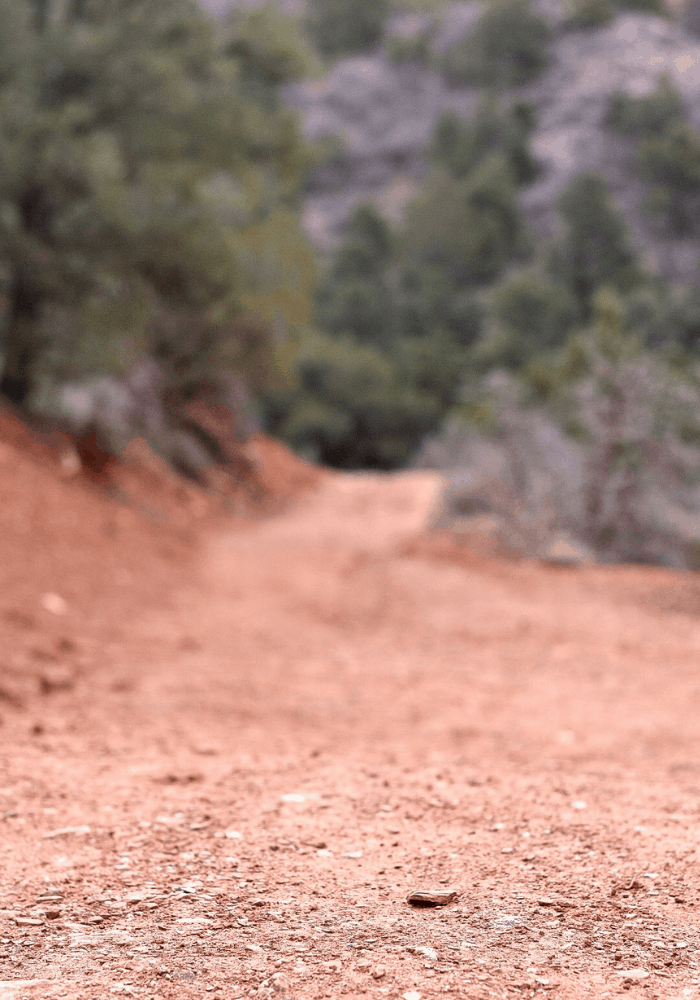
BEGGINING OF THE TRAIL / THE “DRY” SECTION (about 1/2 a mile)
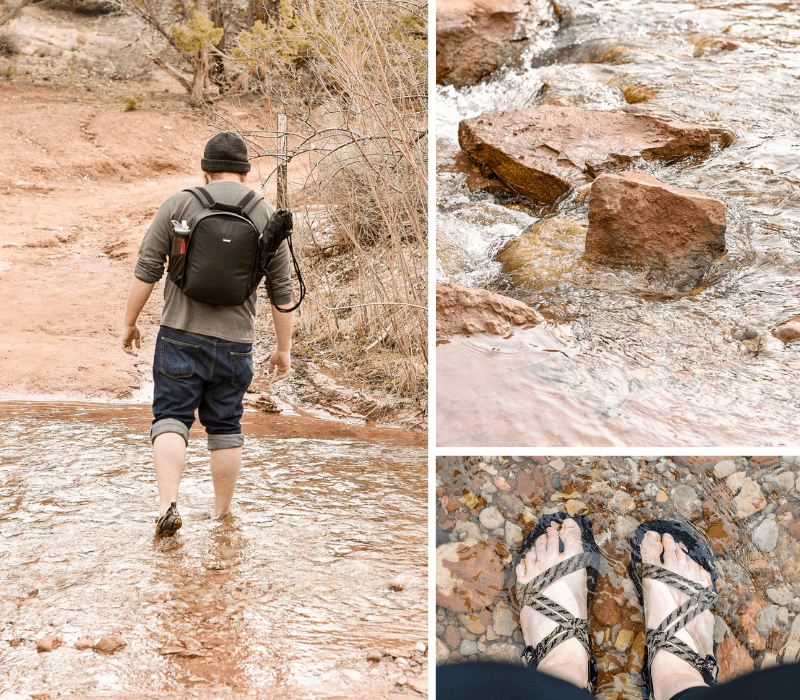
The Kanarra Falls trail begins at the parking lot, which is just a quick jaunt and a flight of stairs away from the actual trailhead. Once you’re up the stairs, you’ll see a gate with a small people-sized opening, and behind it you’ll see the ticket or check-in booth. Someone should come out to meet you to scan your tickets (or help you purchase tickets). They’ll give you some general information about the trail, warn you about saftey risks, yada-yada… Nobody cares, let’s just get to the good stuff.
Just kidding guys, I care about safety.
Once checked in, you’ll begin the hike. The first part of the trail is straight uphill on a gravel road – but this stretch is less than 1/4 mile. After that, the trail levels out and morphs into a packed, dirt trail.
Less than 1/3 mile in, you’ll find a bathroom with a pit toilet (and hand sanitizer, IF you’re lucky – I was not). This is the only bathroom on the trail so please use it if you need to. Or even if you don’t need to. Once your feet hit that cold water, you’re gonna have to pee. Trust me.
After the bathroom, you’ll come across the first river crossing. There are some rocks you can attempt to skip across, but I wouldn’t recommend it. There is no way to keep dry feet on this trail, anyway. Plus, the rocks are right next to a waterfall/drop-off. Sketchy.
NOTE: Miraculously, some people get lost on this section of the trail. There are some small paths branching off, but as long as you stick to the main (and the widest) trail, you will be fine.
From there the path stays dry and easy, with only slight inclines, until you reach “the fork”. This is the decision point. The trail branches down towards the river and up towards a dry trail. The water was incredibly cold when we went so we opted for the dry trail but in the heat of summer, many people choose to walk through the water to cool off. Just know, whichever trail you pick, you will be in and out of water throughout the remainder of the trail. It is not possible to stay on the dry trail or the river trail the entire length of the hike. There are too many obstacles on both.
MIDDLE SECTION / THE “WET AND DRY” SECTION (about 1 mile)
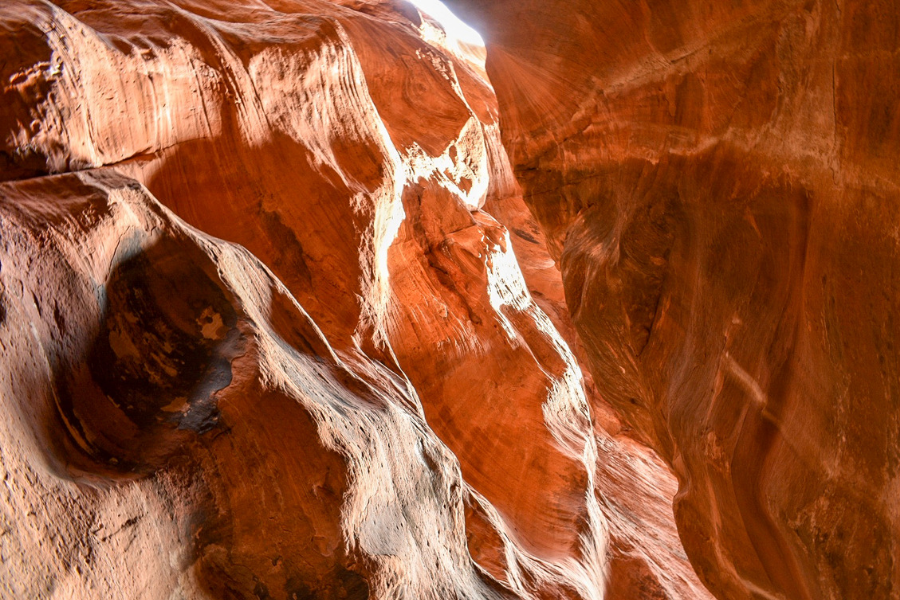
This is the most difficult section of the trail since the terrain is a little unpredictable. Some people complain about the trail being poorly marked (it isn’t marked at all), but with any semblance of navigation skills it is pretty simple to find your way. You’re hiking through a canyon and following a river. Pretty straight forward. But you will have to decide on your own when and where to cross the river. This slows the pace of the hike quite significantly.
Expect to do a little scrambling on the dry sections of the trail – nothing crazy, but there are some boulders that you’ll need to climb over. Also expect some narrow sections of trail, some slippery descents, and some difficult footing. This is what makes this short, flat trail a “moderate” hike.
NOTE: Be very careful when crossing the river. The riverbed is rocky and it’s easy to lose your footing. I can totally see how somebody could roll their ankle doing this hike. Amazingly, I only walked away with a couple bruises and scrapes, which is pretty miraculous for this clumsy hiker.
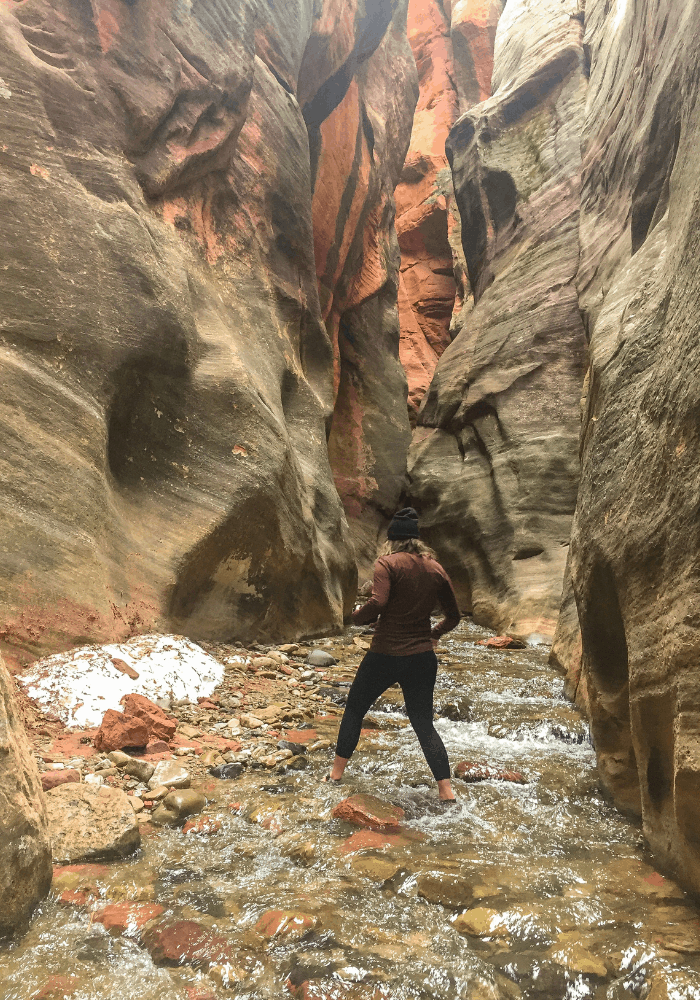
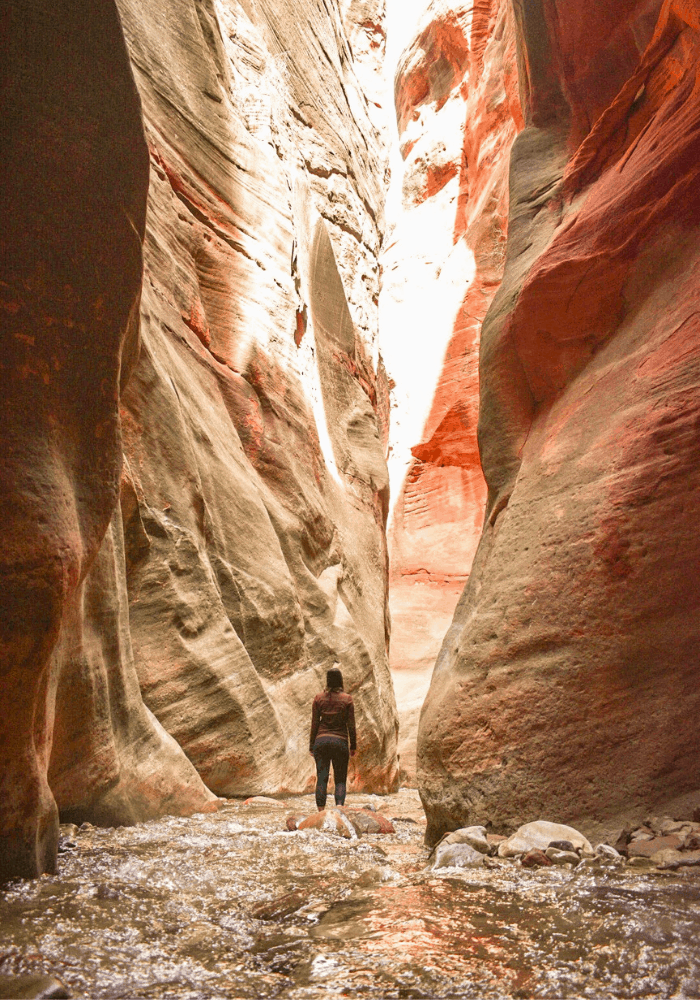
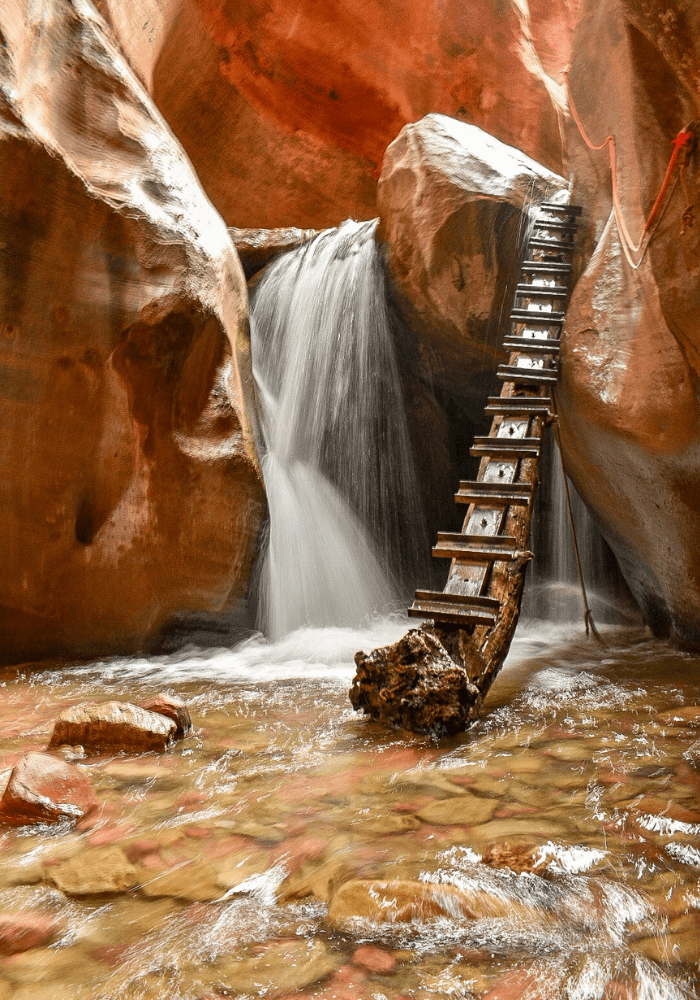
THE NARROWS & THE FIRST WATERFALL (less than 1/4 mile)
About 1.6 miles into the trail, you’ll reach what I like to call “The Mini-Narrows”. The canyon closes in around you and at this point, there’s no choice but to walk straight through the river. Depending on the weather, this could be a curse or a blessing.
Be very careful on this short stretch and mind your footing. The water gets faster here as you approach the first waterfall.
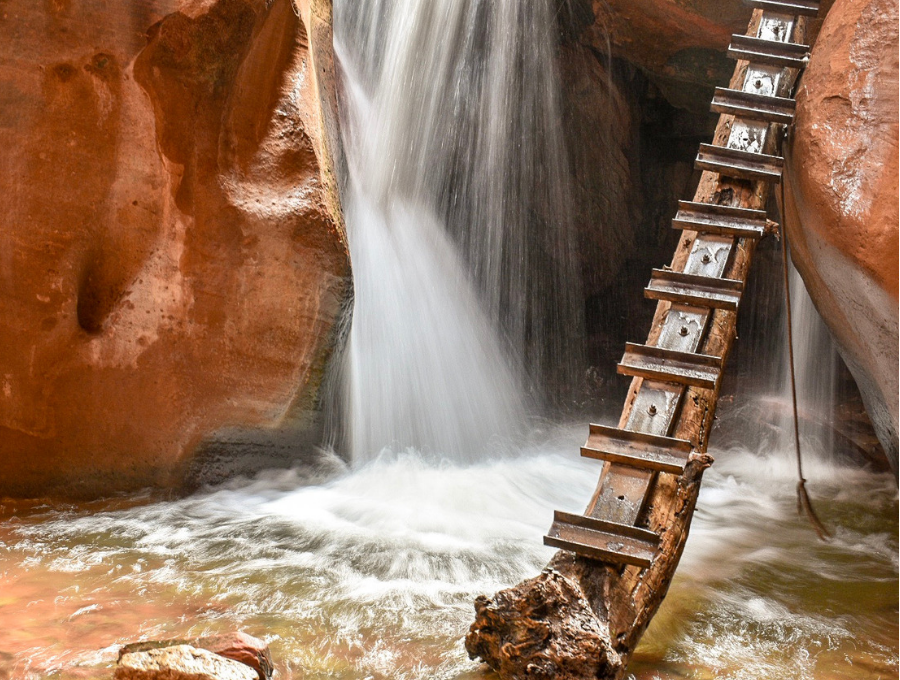
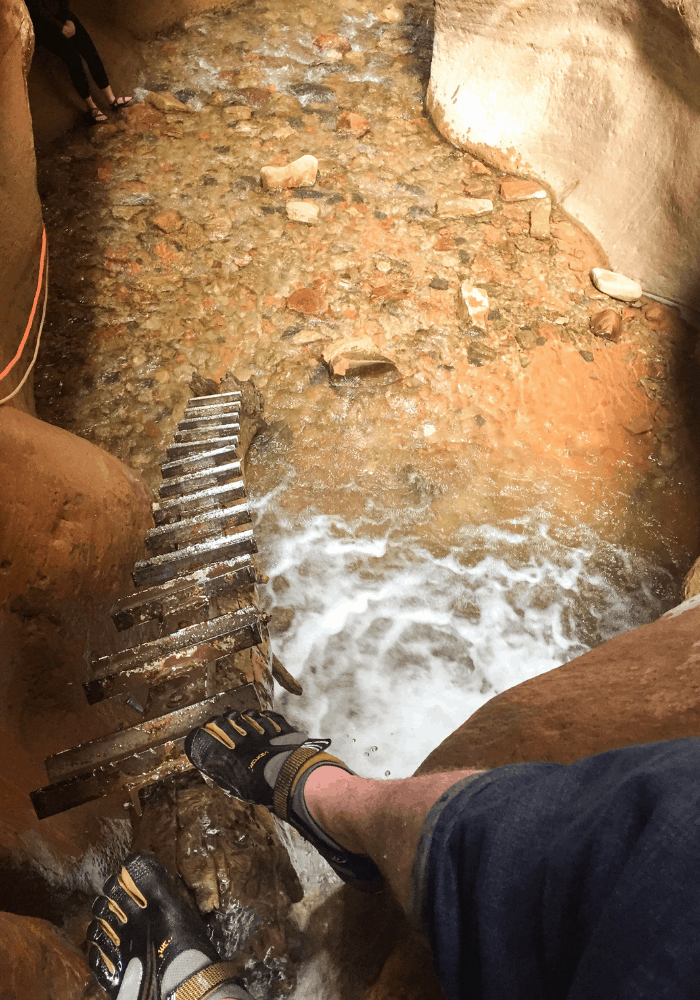
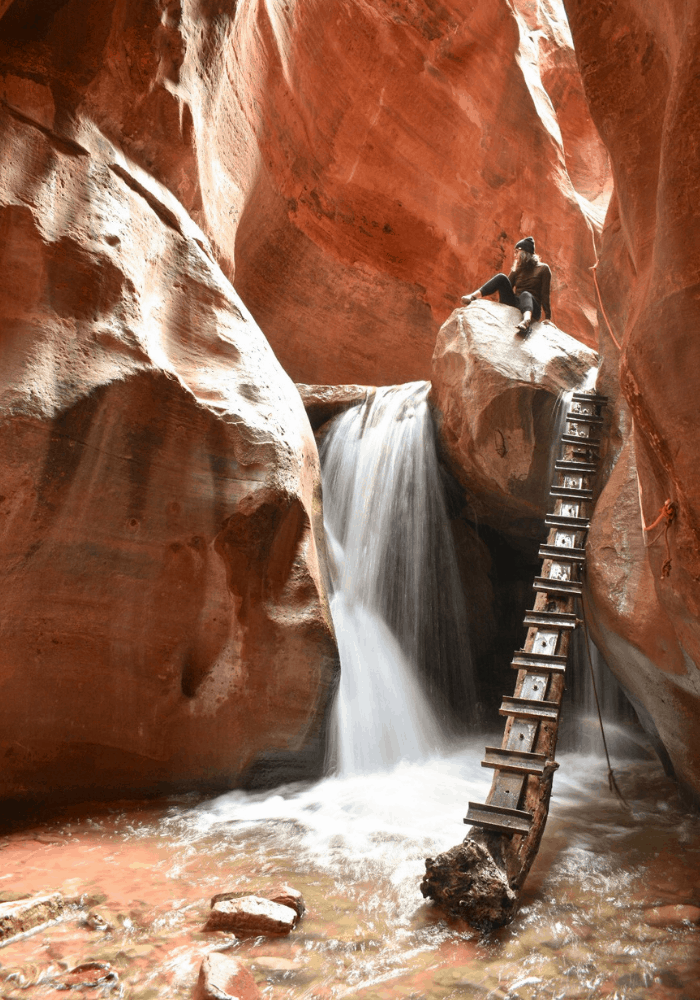
The sounds of the waterfall will get louder and louder until you round that last corner and… viola! Picture-perfect beauty. This is the iconic waterfall that you’ve probably seen a zillion Instagram photos of. At this point you can either get some photos and turn around, or you can ascend the ladder. The “ladder” is a tree with metal rungs bolted to it. BE VERY CAREFUL, especially when coming back down, and be sure to use the rope to help you balance. I thought the rope would be useless but, seriously, it helps. Especially for us uncoordinated people.
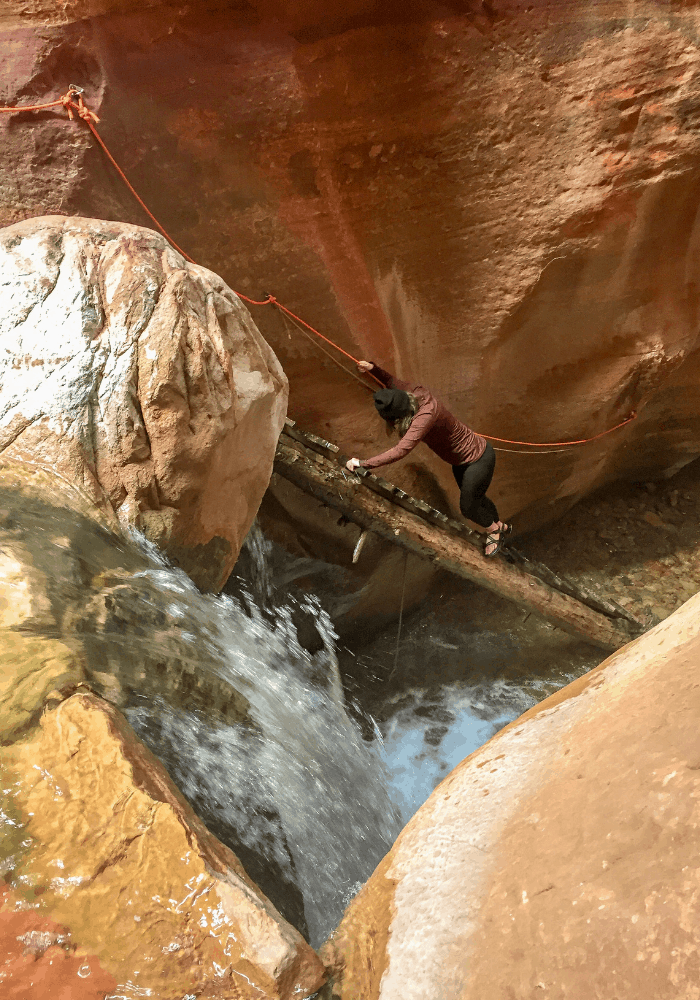
After ascending the first waterfall, you can continue on to the 2nd waterfall if you want to. It is only another .2 miles or so. At the moment there is still a ladder (very similar to the ladder you just climbed) at the second waterfall, but it is currently off-limits. They plan to remove the ladder altogether this year, so this is as far up the trail as you can go.
IMPORTANT NOTES
- WEATHER CAN CAUSE THE TRAIL TO SHUT DOWN: Be sure to check the website, here, before leaving for your hike. They will update the website whenever there’s a closure.
- FLASH FLOODS ARE POSSIBLE: They should shut down the trail if there is any threat, however, it’s still advisable to check the weather for rain before heading out.
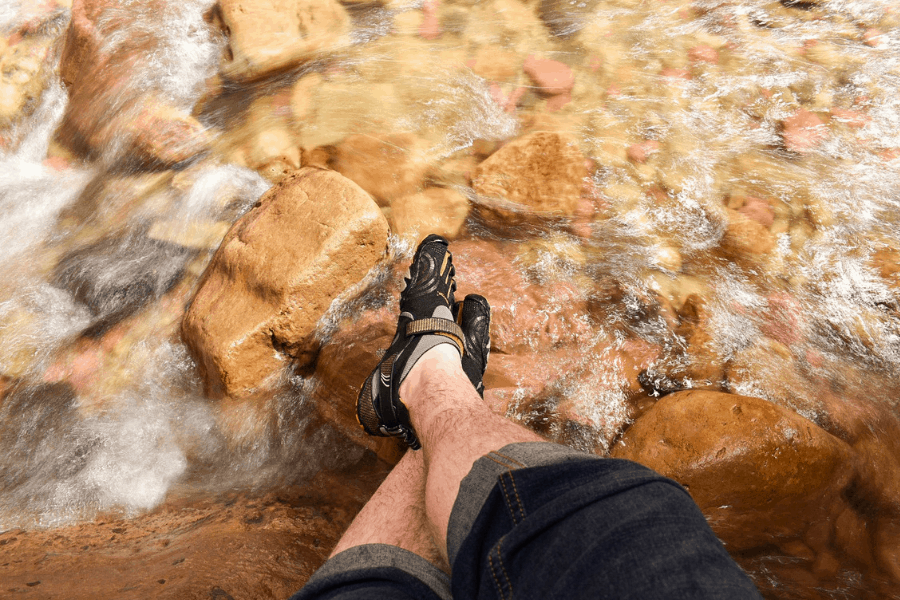
- YOU WILL GET WET: Duh, I know. But some people are actually surprised by how much water is involved in this hike. Be prepared to get wet up to about mid-calf (and that’s if you’re doing your best to stay dry).
- THE WATER CAN GET EXTREMELY COLD: If you’re hiking this trail during the shoulder season, be prepared for some frozen feet. Also, do not wear socks unless you’re going the neoprene-sock route. Regular socks will do a great job of keeping your feet wet and cold all day long.
- FOOTING CAN BE TRICKY: Especially at river crossings. Take your time, watch your footing, and wear shoes with great grip.
- OPERATING HOURS VARY: Check the website, here, the day before and the morning-of – just to be safe. The hours change throughout the year. Hours are shorter during the off-season and longer when the weather gets warmer and people start coming out of hibernation.
PACKING TIPS
It’s difficult to know what bring on this hike and information online is limited. (Hence, why I went into this hike completely unprepared.) But lucky for you, I made all of the mistakes so that you don’t have to! Here are my tips for what to bring on the Kanarra Falls hike.
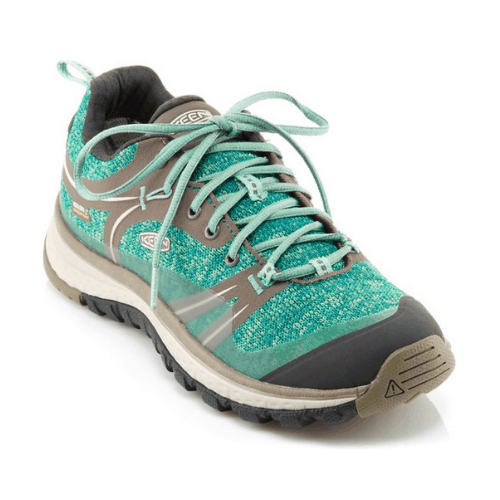
FOOTWEAR & SOCKS
Footwear is super important on this hike! I wore my Chacos (with no socks) and it wasn’t terrible, but it wasn’t great either. One of my feet got scraped up (probably by a rock when my feet were too numb to notice) and I noticed towards the end of the hike my big toes were a little sore from rubbing against the sandal. I definitely recommend closed-toed shoes made from breathable material (Merrill is a GREAT brand for this) with either neoprene or wool socks – NOT COTTON. Reviews about neoprene socks are mixed and, honestly, my vote is with wool – but the choice is yours.
Here are some great options for footwear:


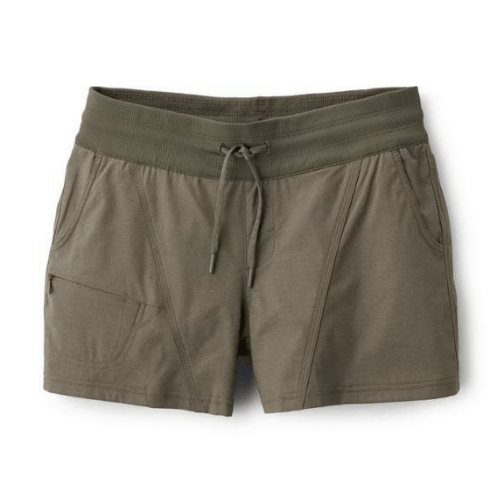
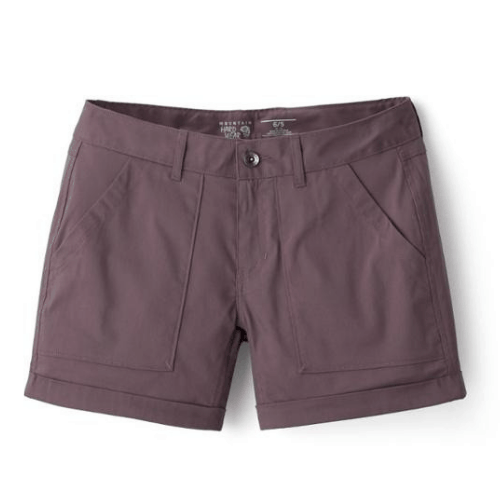
BOTTOMS
Don’t be an idiot like me and wear cotton leggings on this hike! They WILL get wet and they’ll stay wet throughout the hike. Instead, wear shorts that are knee-length or shorter. Even if it’s a little chilly out, it’ll keep you feeling much more comfortable than if you were wearing wet pants.
Here are some hiking shorts to choose from (my personal fave are the North Face Aphrodite shorts- far left):


TOPS
What you wear on top isn’t as important on this hike, but you should stick to synthetic materials. Also, if you’re hiking when it’s a little chillier out, make sure to layer. I wore a tank top with a mid-weight base layer over top. That way, when it warmed up, I could just tie the base layer around my waist or stuff it in my backpack.
Here are my “top” picks for tops:


ADDITIONAL GEAR
- Trekking poles*: This is one of the few hikes that I wished I had trekking poles. They make life much easier, especially when trying to balance on round rocks through rushing water. It’s doable without them (for those on a budget) but if you already have them, definitely bring them!
- Water bottles or a Hydration Pack*: Bring 1-2 liters of water per person. 1 liter was more than enough for me but the needed amount can increase or decrease depending on your age, weight, the temperature outside, and a lot of other factors. If you’re considering a hydration pack, I love this Osprey pack* that I bought for trail running!
- Camera gear: See tips below!
PHOTOGRAPHY TIPS
I’m definitely not an expert photographer – so photography snobs, please don’t judge me! For people who are brand new to photography, like me, here’s what worked for me to capture that iconic 1st waterfall photo.
- A shutter speed of 1/8 – to give the waterfall that smoothed-out look. I played around with the shutter speed until I found what worked best. Looking back, I probably should have gone for a slightly longer shutter speed. But considering the fact that we didn’t use a tripod – this may have been the best case scenario anyway.
- A 20mm lens – Wider is better for this location. I used my kit lens (18mm – 55mm) and had it zoomed almost all the way out to get everything in frame. I used my kit lens because I haven’t had the dough to get the wide angle lens that I have my sights set on… Someday! (P.S. I’m not hating on kit lenses. It’s just that, ideally, I’d like to get a faster lens to get crisper photos 🙂
- No tripod – we brought it, but it was too much of a pain to set up in the rushing water and there wasn’t a flat or stable place to set it down. It’d probably be doable with a heavier tripod, though.
- No ND filter – again, I had one on hand, but the lighting was dim enough that even with the slower shutter speed the photo wasn’t overexposed.
Anything I left out? You can ask me questions about Kanarra Falls, or anything else really, in the comment section below!
SHARING IS A BEAUTIFUL THING… PIN ME!
Like your site. Pretty well put together (as are you).
Did this hike before the permit system (and, probably before you were born). Pretty much nobody even knew it existed. And, with all of the other options available (like Zion), most people turned there noses up to it. In fact, someone I met at Zion told me about this place.
Back then, the locals tried to discourage people from doing the hike. It was the old “we don’t like your kind around here attitude”. Being 6′ 3″ tall and from Chicago, I just got some glares. No one had the guts to actually say anything to me.
Also, when I did the hike I was basically trespassing on some parcels of privately owned property. Since none of them were posted with “no trespassing” signs, that was just a legal technicality. Nobody that actually owned the property was monitoring it. So, who cares?
About the only advantage to being in my 70’s, is that I got to bum around all of the national parks when they weren’t loved to death. I was traveling thru Moab recently and Arches was like being in Disneyland.
Oh well, enjoy you youth. That’s the time to be reckless and roaming.
Wow, that must have been incredible to see it before all the crowds! Fortunately, when I went it was still the “off-season” so there were only 2 other groups on the trail. I heard it can get pretty crazy in the summertime! I love that more people are getting outdoors these days but it was a little strange having a gated hike with a guy checking tickets. That was a first for me! Haha.
I have to admit, I’ve done some “trespassing” as well to access trails. None of which I talk about on the blog – I’m sure I’d get some serious backlash if I did!
I hope you’re still exploring! Sounds like you’ve had some amazing adventures so far. Really appreciate your comment 🙂
Great Article!
I plan on doing both this and The Narrows hike this late September!
I’m thinking of renting canyoneering boots w neoprene socks for 2 days and use for both these hikes…..
Ooo that would be so much fun!! It was December when I visited Zion, so I really wanna go back when it’s slightly warmer and do the Narrows. Sounds like your trip will be epic!
[…] THE TRAIL GUIDE TO KANARRA FALLS […]
[…] THE TRAIL GUIDE TO KANARRA FALLS […]
[…] THE TRAIL GUIDE TO KANARRA FALLS […]
[…] Kanarra Falls (Image source: Reckless Roaming) […]
Do you happen to know when the rainy season is? I’d like to go late April or early May. This looks like an incredible hike.
April or May should be a great time to hike it! When I did a Utah road trip in late April we got a few light sprinkles here and there but nothing that would ruin a hike. From what I can tell, they don’t get much rain in the area in general, but the driest months are April – June
Can you please let us know if neoprene socks and sticks are available for buy or rent at Kannara falls
Hi Sania! When I visited I didn’t seen anything like that and there is nothing on their website about gear rentals (at least that I could find). It might have to be a 3rd party rental place. I know for sure there is a place near Zion NP (Zion Outfitter) that rents that sort of thing, but they are about 1 hour away from the actual falls which is a bit of a drive.
You absolutely know how to keep your readers interest with your witty thoughts on that topic. I was looking for additional resources, and I am glad I came across your site. Feel free to check my website Webemail24 about Website Traffic.